Frontier Email Settings For Android, iPhone & Outlook 2016

Frontier email is a more secure and easily available email service for technological users. Apart from being a state of the art email service, Frontier also provides support for various mobile operating systems like ios, android, and third party clients like Outlook. So, without wasting more time let’s dive straight into it.
Are you also searching for the methods of what are the Frontier Email Settings on Android/ iPhone/ Outlook then, you are on the right platform.
This article provides different methods consisting of quick and easy steps to set up the frontier email settings on android, iPhone, and outlook 2016.
Note: The solution is given for the Frontier Email Settings on Outlook 2016 can also be used while setting up the Frontier Email Settings for Outlook.
Table of Contents
1. Easy steps for Frontier Email Settings For iPhone.
2. How to set up the Frontier Email settings on android devices?
3. Method for Frontier Email Settings for Outlook 2016.
4. Method for Frontier Email Settings For Outlook 2010
Frontier Email Settings For iPhone
- Go to Settings
- Now click on Mail, Contact, and Calendars.

- Click on Add Account and then choose ‘Other’

- Now you will have to click Add Mail Account

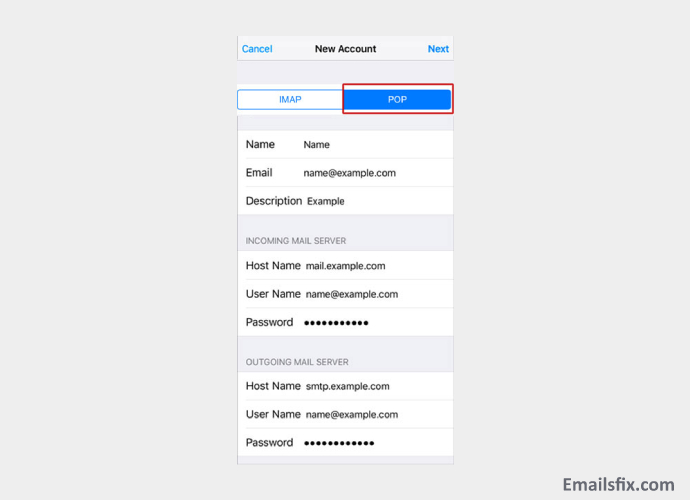
- Enter your full name.
- Enter your full email id
- Enter your Frontier email password
- For description use ‘Frontier’
- Choose POP3 in the ‘incoming mail server’
- For ‘outgoing mail server’ enter
Smtp.frontier.com should be the hostname.
Enter your email id
Enter your password
- Tap Save
- Now, you have successfully set up Frontier email id
Frontier Email Settings On Android
Setting up frontier email on android device is fairly straightforward, just follow these simple steps:-
- Open your Mail app.
- Click on pop3
- Now, you will have to enter your full Frontier email id and the password.
- Select Manual Set up.

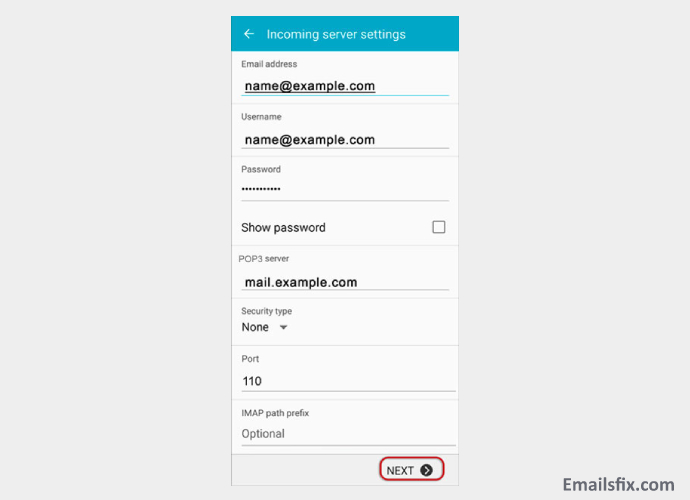
- In the incoming server tab, enter the following:-
- For username, use your full email id.
- Password:- Your Frontier email password
- Incoming server should reflect pop3.frontier.com
- 995 should be the incoming port value
- Secure - Port: 993 and Security Type: SSL/TLS (Accept all certificates)
Insecure - Port: 110 and Security Type: None (Accept all certificates)
SSL should be the security type
- Click on Next
- For Outgoing settings, enter the following:-
Smtp.frontier.com should be in ‘outgoing server tab
465 should be the port value
- Outgoing (SMTP roaming server) Secure - Port: 587 and Security Type: SSL/TLS (Accept all certificates)
Outgoing (SMTP) - Port: 25 and Security Type: None (Accept all certificates)
Outgoing (SMTP roaming server) Insecure - Port: 587 and Security Type: None (Accept all certificates)
SSL should be the security type
Enter your username and password
- Now, click on Next.

- You will now be prompted to enter preferences.
- Click on Finish.
We hope that you must have got the procedure of Frontier Email Settings On Android
Frontier Email Settings for Outlook 2016
- Open your Microsoft Outlook application
- Open the files tab
- Now, choose the account from the drop-down menu.

- Now, click on the Advanced tab.
- Choose Manually set up an account from the left.

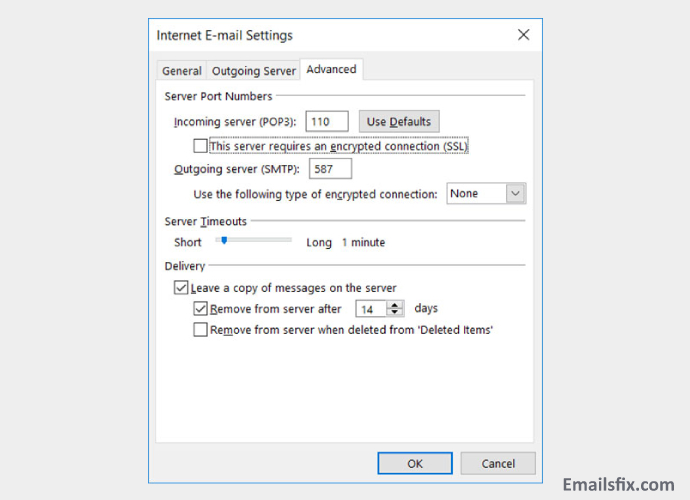
- In the incoming mail server settings, enter the following:-
In the server tab, enter pop3.frontier.com
995 should be reflected as the port value
General settings for POP
- Secure - Port: 995 and Security Type: SSL/TLS (Accept all certificates)
- Insecure - Port: 110 and Security Type: None (Accept all certificates)
When prompted for authentication put Yes
- Enter the following as the ‘Outgoing Mail Server’ Settings
In the server tab enter ‘smtp.frontier.com’
465 should be entered in port
- SSL should be entered in the Encryption Method
- Now you will have to save the changes.
- Click on Test, to make sure the settings work.
Frontier Email Settings For Outlook 2010
Launch Outlook, then click on ‘File’ option followed by ‘Info’.
1. Click on ‘Add Account’.
2. Click on the circle beside the display message ‘Manually configure server settings’. Click ‘Next’.
3. Click on ‘Internet Email’ & ‘Next’.

4. Now click the circle next to Internet Email and then click ‘Next’.
5. Now follow these steps:
- Enter your name in the ‘Your Name’ field under 'User Information' section, and enter your Frontier email address in the ‘Email Address’ field.
- In the ‘Server Information' section, select POP3 as the Account Type, enter pop3.frontier.com for the ‘Incoming Mail Server (POP3)’, and enter smtp.frontier.com for the ‘Outgoing Mail Server (SMTP)’.
- In the ‘Login Information’ section, enter your full email address in the ‘Username’ field, and your password in the ‘Password’ field.
- Click ‘More Settings’.
6. On the ‘General tab’, enter a name for the ‘Mail Account’, for example, your Frontier email address, pop3.frontier.com or Frontier.
7. Click the ‘Outgoing Server tab’, select ‘My Outgoing Server (SMTP) requires authentication’, and ‘Use the same settings as my incoming mail server’.
8. Click the ‘Advanced’ tab
- For the ‘Incoming mail server’ enter 995. Put a tick on the box beside ‘This server requires an encrypted connection (SSL)’.
- For the ‘Outgoing mail server’ enter 465. Select SSL from the dropdown menu by ‘Use the following type of encrypted connection’.
- Click ‘OK’.
9. Ensure there is a check stamp beside ‘Test Account Settings by clicking the Next button’ & Click ‘Next’.
10. Click ‘Finish’.
Frontier Windows Live Server Setting
1. Launch Window Live Mail and then click on the option ‘Add Email Account’
2. Type your Frontier email address in the ‘Email Address ‘field.
3. Type the Frontier mail password in the ‘Password Field’.
4. Enter your true name in the ‘Display’ field and then click on the Next button.
5. You need to fill up server setting details when you see the text message ‘My incoming mail server is a POP3 server’ on the top panel of the Window:
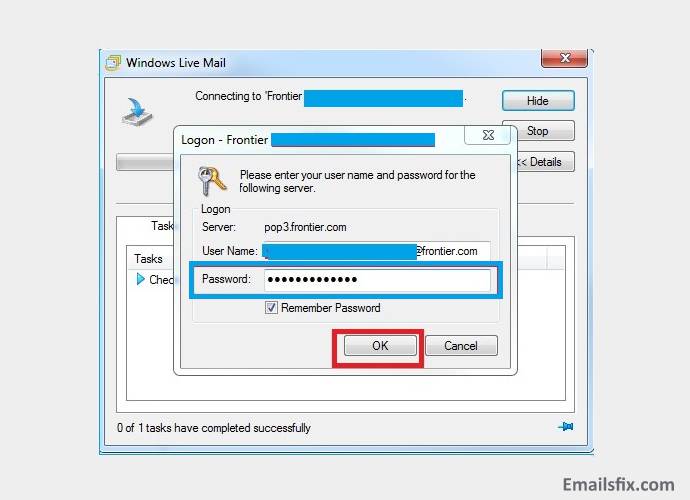
- Incoming server: pop3.frontier.com
- Outgoing server: smtp.frontier.com
- Your login ID is your full Frontier email address.

6. This is the verification or authentication step. You need to put a tick in the checkbox to the left side of the text ‘My Server’.
7. Move to the next stage by clicking Next and Finish button
8. For enabling of SSL encryption do the following:
- Click on ‘Email Account’.
- Click on ‘Properties’ tab followed by the ‘Servers’ tab.
- Look carefully to confirm that you have pop3.frontier.com and smtp.frontier.com for the incoming server and the outgoing server respectively.
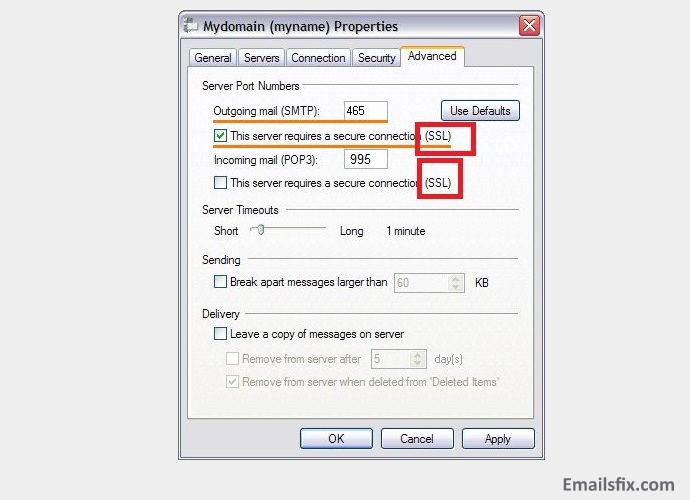
9. Click on the ‘Advanced’ tab.
10. Type 465 for the outgoing mail server and tick the checkbox next to ‘This server requires a secure connection (SSL).’
11. Type 995 for the incoming mail server type 995 and tick the checkbox next to ‘This server requires a secure connection (SSL).’
12. Click OK.
Some more steps for Frontier Windows Live Server Settings:
1. Enter the name in ‘Your Name’ field in the User Information Area.
2. Enter Frontier email id in the ‘Email Address’ field.
3. Select POP3 as the server account type in ‘Server Information Area’ and type pop3.frontier.com for Incoming Mail Server (POP3)’ and smtp.frontier.com for the ‘Outgoing Mail Server (SMTP)’.
4. Enter a full email address in the ‘Username’ field followed by a password in the ‘Password’ field in ‘Login Information Area’.
5. Click on ‘More Settings’.
6. Enter a name for ‘Mail Account’ in the General Tab
7. Click ‘Outgoing Server Tab’ and select ‘My Outgoing Server (SMTP) requires authentication’. Follow the same setting for ‘Incoming Server Tab’.
8. Click on ‘Advanced’ tab
9. Type 995 for ‘Incoming mail server’ and tick the checkbox beside the message ‘This server requires an encrypted connection (SSL)’.
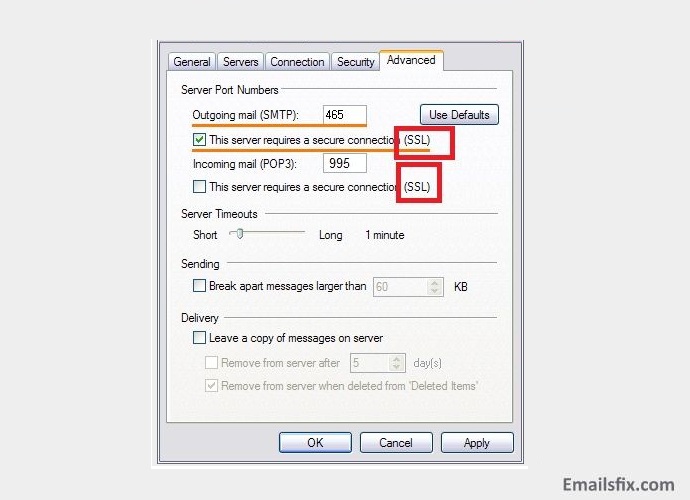
10. Type 465 for ‘Outgoing mail server’. Then select SSL from dropdown list ‘Use the following type of encrypted connection’.
11. Click ‘OK’.
12. Confirm check stamp beside ‘Test Account Settings’.
13. Click ‘Next’ and ‘Finish’.

Frontier Email Setting POP3, IMAP & SMTP
Get started to add on the feature of Frontier Email support by making the following setting changes:
Incoming mail server for Frontier mail
The following refers to Frontier IMAP & POP3 Setting:
- Account Type: POP
- Username: Your email address is your username
- Server port: 995
- Authentication: Password
- SSL/TLS: Yes
Outgoing Webmail Server Settings for Frontier Email
- Username: Your email address is your username
- Server hostname: smtp.frontier.com
- Server port: 465
- Authentication: Password
- SSL/TLS: Yes
We are hopeful that these are the most efficient steps that can help you in the Frontier Email Settings on Android, iPhone & Outlook 2016. Please note that for some third-party clients and software you might have to tweak the Frontier Email Settings a little bit. Emailsfix always tried to bring the simplest solutions and methods of all your minor or major queries. If you were unable to follow the aforementioned solutions did not help then we advise you to contact our experts over a chat. Emailsfix experts have been praised by thousands of customers from all over the world. Hence, try it and know yourself.
 Frontier Mail Settings
 Frontier Mail Login