Xplornet.Com Mail Settings

If you want to know about the xplornet.com mail settings, then you have landed on the right page. Find below the Xplornet email settings described in detail for iPhone, Android, and Outlook. When you wish to configure your Xplornet email account, you need to apply certain Xplornet.com mail settings that help use the email services properly.
The settings are mainly for incoming and outgoing email services. You can either choose the POP or IMAP server for the incoming email services. However, the outgoing email services are handled by the SMTP server. Without proper POP, IMAP, and SMTP server settings, the email services will not function on your Xplornet email account.
Read this guide thoroughly and gain complete knowledge about the Xplornet.com email settings. The settings are broken into multiple steps that are really easy to follow and execute. No technical expertise required.
So let’s begin with the incoming and outgoing Xplornet.com mail settings first. Here we go:
Xplornet.com Email IMAP Server Settings (Incoming Mail Server)
The below-mentioned settings will enable the incoming email services for your Xplornet.com email account. You just need to input and apply the same settings as below.
| Xplornet.com Incoming Email Server account type | IMAP |
| Xplornet.com Incoming Email Server user name | Your full Xplornet.com email address |
| Xplornet.com Incoming Email Server password | Your Xplornet.com email password |
| Xplornet.com Incoming Email Server hostname | Incoming.xplornet.com |
| Xplornet.com Incoming Email Server Port | 143 |
| Xplornet.com Incoming Email Server TLS/SSL required | NO |
| Authentication required | YES (Email account Username and Password) |
After you apply the aforementioned incoming mail server settings for your Xplornet email account, you will start receiving the emails without any problem.
Xplornet.com Email SMTP Server Settings (Outgoing Mail Server)
You also need to apply the outgoing mail server settings to your Xplornet.com mail account to use the outgoing email services of the Xplornet.com. So, below are the correct outgoing mail server settings that you need to input and apply.
| Xplornet.com outgoing Email Server account type | SMTP |
| Xplornet.com outgoing Email Server user name | Your full Xplornet.com email address |
| Xplornet.com outgoing Email Server password | Your Xplornet.com email password |
| Xplornet.com outgoing Email Server hostname | smtp.xplornet.com |
| Xplornet.com outgoing Email Server Port | 25 |
| Xplornet.com outgoing Email Server TLS/SSL required | NO |
| Authentication required | YES (Email account Username and Password) |
As soon as you apply the Xplornet.com outgoing mail server settings as mentioned above, you will be able to use the outgoing mail services. You can try sending emails to one of your mail contacts to check if the services are working.
Xplornet Email Settings for iPhone
Do you have this “how to set up Xplornet email on iPhone?” question in your mind? Don’t worry, read and find below the stepwise procedure to set up Xplornet email on iPhone. You also need to input and apply certain Xplornet email settings for the iPhone that are mentioned below in the steps. The Xplornet email settings are required in the process of the Xplornet email account configuration.
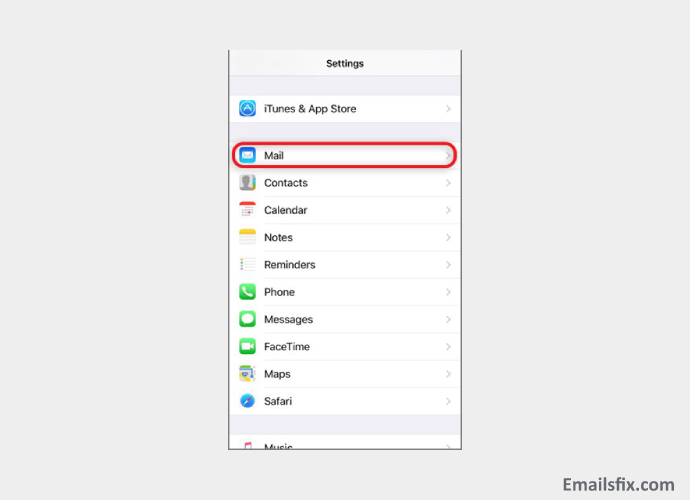
Step 1- Firstly, go to the settings of your iPhone.

Step 2- Now select the “Mail” option.
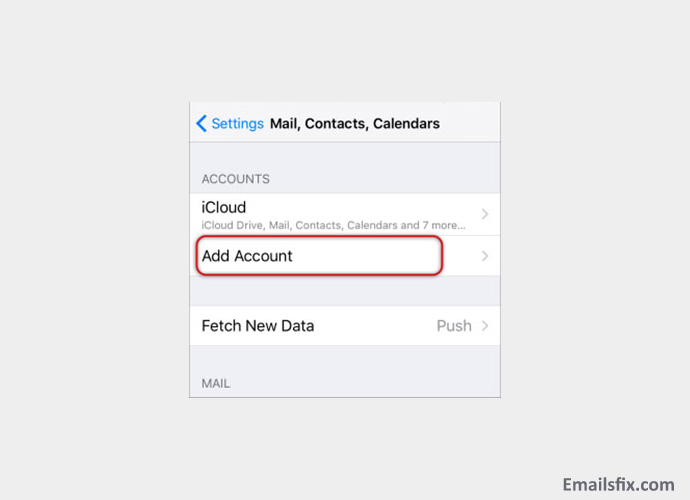
Step 3- Select the “Accounts” option.

Step 4- Make a selection for the “Add Account” option.
Step 5- Select the “Other” option from the available menu.

Step 6- Select the “Add Mail Account” option.

Step 7- Input the required details such as your name, Xplornet.com email address and password and then click on the “Next” button.

Step 8- Select the IMAP server. Move towards the section of an incoming mail server and input all the required details, then input the details for the outgoing mail server as well and then click on the “Next” button.
- Make sure that your complete email address is the Username. The username and password remain the same for both the incoming and outgoing email servers.
- The incoming mail server hostname must be “incoming.xplornet.com”.
- The outgoing mail server hostname must be “smtp.xplornet.com”.

Step 9- You may see a prompt message appearing on the screen to verify the incoming and outgoing server settings. You can either click on the “Continue” button for both or click on “Details” and then “Trust”.

Step 10- Click on the “Save” button.

Step 11- Make a selection for the newly created account.
Step 12- Select the SMTP server.

Step 13- Make sure that the SMTP server settings are as mentioned below and make a click on the “Done” button.
- The outgoing mail server hostname must be set as “smtp.xplornet.com”.
- Your complete Xplornet email address must be the username.
- Your email account password must be the password.
- You can set the SSL to On or turn it off and then input the below port settings manually.
| Outgoing secure port (SMTP) | 465 |
| Security type | SSL/TLS (Accept all certificates) |
| Outgoing secure port (SMTP roaming server) | 587 |
| Security type | SSL/TLS (Accept all certificates) |
| Outgoing port (SMTP) | 25 |
| Security type | None (Accept all certificates) |
| Outgoing insecure port (SMTP roaming server) | 587 |
| Security type | None (Accept all certificates) |
Great! You have completed the Xplornet.com email account configuration procedure and the correct Xplornet email settings for the iPhone have been applied. Now, you can start sending/receiving emails without any hassle.
Xplornet.com Mail Settings for Android
Find below the stepwise Xplornet.com mail settings for android. Just follow all the steps carefully and you will be able to set up your Xplornet email account on your android device within a matter of a few minutes.
Step 1- Firstly, you need to click on the mail icon that is available in your android device’s app drawer menu.
Step 2- input your Xplornet.com complete email address and password.

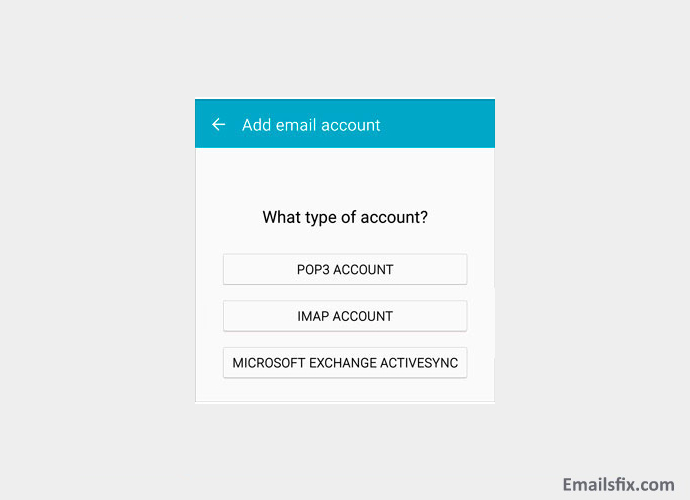
Step 3- Select the “Manual setup” option.
Step 4- Now select “IMAP”.
Step 5- If you have selected the IMAP server, then you need to input the below-mentioned settings and then click on “Next”.
| IMAP server | Input “incoming.xplornet.com” |
| IMAP port | 143 |
| Secure port | 993 |
| Security type | SSL/TLS (Accept all certificates) |
| Insecure port | 143 |
| Security type | None (Accept all certificates) |

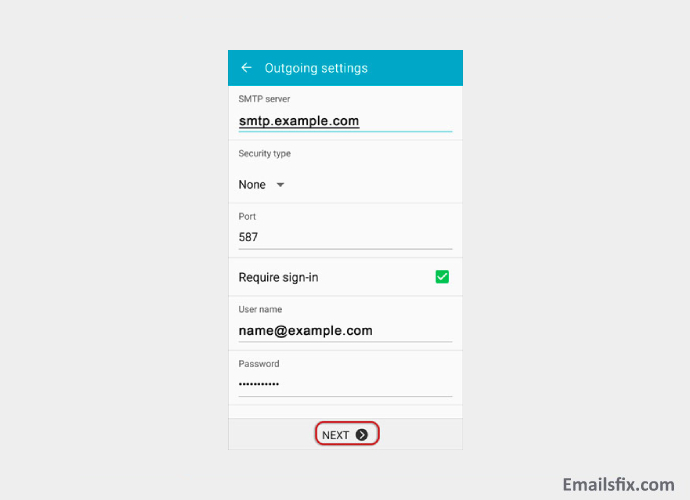
Step 6- Input the settings as mentioned below for the Xplorenet.com outgoing SMTP server and then click on “Next”.
| SMTP server | Input “smtp.xplornet.com” |
| Security type | None |
| Outgoing SMTP port | 25 |
| Outgoing secure (SMTP) port | 465 |
| Security type | SSL/TLS (Accept all certificates) |
| Outgoing secure (SMTP roaming server) port | 587 |
| Security type | SSL/TLS (Accept all certificates) |
| Outgoing (SMTP) port | 25 |
| Security type | None (Accept all certificates) |
| Outgoing insecure (SMTP roaming server) port | 587 |
| Security type | None (Accept all certificates) |

Step 7- In the end, click on the “Done” button.
Congratulations! The Xplornet.com mail settings for android have been successfully applied and now you can enjoy using the Xplornet.com email services on your android device.
Xplornet.com Mail Settings for Outlook (Automatic setup)
The steps to configure the Xplornet.com email account on Outlook are given below in detail. You will also find below the required Xplornet.com mail settings for Outlook that will enable the email services.
- Firstly, you need to launch the Outlook program on your system.
- Now select the “Tools” option from the available menu options.
- Click on the “Accounts Settings” option.

- On the page of Accounts Settings, click on “New” under the email tab.

- Choose the “Microsoft Exchange, IMAP, HTTP or POP3” option and then click on the “Next” button.
- Input the required details such as your name, your complete Xplornet.com email address and password and then make a click on “Next”.
- Now the Outlook program will configure your Xplornet.com email account automatically as per the IMAP server settings.
- In the end, Click on “Finish” and then “Close”.
This is how you apply the Xplornet.com mail settings for Outlook by following the automatic email account setup process.
Xplornet.com Mail Settings For Outlook (Manual setup)
Learn here about the manual setup process of the Xplornet.com email account on Outlook and the correct Xplornet.com mail settings for Outlook. The settings are more or less similar for all the Outlook versions. You need to follow similar steps as mentioned below regardless of the Outlook version installed on your system.
- Firstly, you need to launch the Outlook program on your system.
- Make a selection for the “Tools” option from the available options in the menu bar.
- Click on the “Accounts Settings” option.
- On the page of Accounts Settings, click on “New” under the email tab.
- Choose the “Microsoft Exchange, IMAP, HTTP or POP3” option and then click on the “Next” button.
- Tick the checkbox that reads as “Manually configure server settings or additional server types” and then click on the “Next” button.
- Choose the “Internet email” option and then click on the “Next” button.
- Input all the required details (select IMAP or POP server as per your requirements) and then make a click on the “More Settings” option.
- Go to the outgoing server tab and make sure that the “My outgoing server (SMTP) requires authentication” checkbox is ticked along with the checkbox reading as “Use same settings as my incoming mail server”.
- Move towards the Advanced tab and make sure that the Xplornet.com email settings are as mentioned below as per the choice of IMAP or POP server.
Xplornet POP Settings
| Incoming port | 110 |
| Outgoing port | 25 |
| Secure port | 995 |
| Security type | SSL/TLS (Accept all certificates) |
| Insecure port | 110 |
| Security type | None (Accept all certificates) |
| “This server requires an encrypted connection (SSL)” | Must not be selected |
| “Use the following type of encrypted connection” | Must be set as None |
Xplornet IMAP Settings
| Incoming port | 143 |
| Outgoing port | 25 |
| Secure port | 993 |
| Security type | SSL/TLS (Accept all certificates) |
| Insecure port | 143 |
| Security type | None (Accept all certificates) |
| “This server requires an encrypted connection (SSL)” | Must not be selected |
- The option reading as “Use the following type of encrypted connection” must be set as None.• Do remember to tick the “This service requires an encrypted connection (SSL)” checkbox for both the incoming as well as outgoing mails if you have selected to use the secure SSL/TLS settings.
Xplornet SMTP server settings
| Outgoing secure (SMTP) | 465 |
| Security type | SSL/TLS (Accept all certificates) |
| Outgoing secure (SMTP roaming server) port | 587 |
| Security type | SSL/TLS (Accept all certificates) |
| Outgoing (SMTP) port | 25 |
| Security type | None (Accept all certificates) |
| Outgoing insecure (SMTP roaming server) port | 587 |
| Security type | None (Accept all certificates) |
- Click on the “OK” button to save the aforementioned settings.
- In the end, click on the “Next” button and then “Finish”.
Now, you have successfully applied the required Xplornet.com mail settings for Outlook. Start using the Xplornet email services on Outlook without any issue or problem. The aforementioned Xplornet.com email settings will work for any of the Outlook versions.
We hope that after going through this guide, you know the Xplornet.com mail settings for iPhone, Android, and Outlook and have no confusion in your mind whatsoever.
But if you are still not able to configure your Xplornet email account, then use the live chat support service and get connected to our trained experts. Our experts can resolve all your Xplornet.com email related queries and doubts. We are at your service 24*7, contact us anytime and get expert assistance.
Want to know the Earthlink email settings and Frontier email settings as well? Then know here the same in detail. You will find here a one-stop guide to the Earthlink and Frontier email settings for the different devices and email clients. The steps are well described and you won’t face any problem while following and executing them.