How To Set Up Cox Outlook Settings 2010 & 2016

Microsoft Outlook is currently one of the best email clients on the market right now. So its only natural that you might be wondering what are the cox email settings for outlook are how to set it up. In this guide, we will take through all the steps involved in the cox email settings for outlook.
Let’s dive straight into it:-
- Start Microsoft Outlook
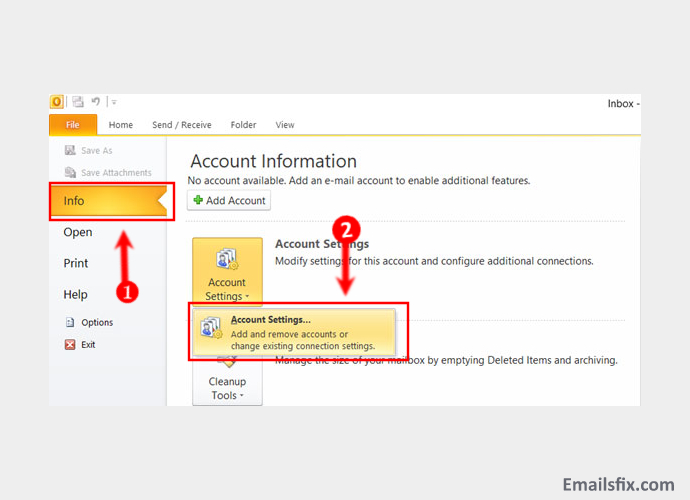
- Click on the File tab and go to ‘Account Settings.’
- Click on the Email tab.
- Now click on ‘New.’
- Go to Server settings and click on ‘Next.’
- Select your Cox email address and enter the following details.
- Mention Your full name.
- Mention your full Cox email address.
- Go to ‘Type Account’
- Now select POP3 and mention the following details:-
- The incoming email should be ‘pop.cox.net
- The incoming port value should be 110
- ‘Outgoing email should be smtp.cox.net
- ‘Outgoing’ port value should be 25
- When prompted for ‘login information,’ enter the following details:-
- Mention your full Cox email address
- Enter your password.
- Security should reflect ‘none.’
Now you can click on ‘Test Account Settings’ if everything checks out, then you have successfully set up cox email on outlook.
If you are wondering as to what are Cox Outlook 2016 settings, then we will help you out. The process is almost the same, but there are some slight changes. Please note that if you are looking for Cox Outlook 2010 settings, then the below- mentioned settings would be applicable.
Manual Cox Outlook Settings 2010
- Open Outlook
- Click on the Files tab.
- In the ‘Account Information’ section, choose ‘Add Account.’

- Now you will have to click on ‘Manually Configure Settings’

- Now select ‘Internet Email.’
- Click on Next

- Enter all the user information.
- Go to the drop-down menu and select POP3
- You will be directed to the ‘Account information’ section. Here, mention your full email address and password and click on ‘Next.’
- Now you will have to click on the ‘More Settings’ tab
- Go to the ‘Advanced Settings Tab. Make Sure your choice of either POP or IMAP
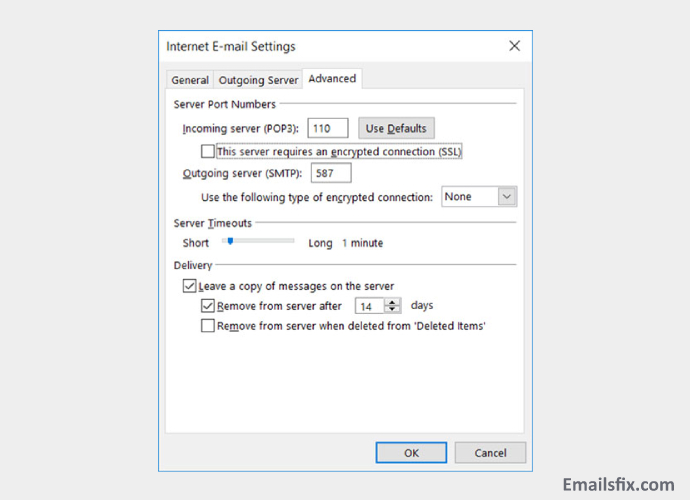
Cox POP3 Email Settings For Outlook 2010
- Incoming Port: 110, Outgoing Port: 587
- General settings for POP
- Secure - Port: 995 and Security Type: SSL/TLS (Accept all certificates)
- Insecure - Port: 110 and Security Type: None (Accept all certificates)
- Not ticked: This server requires an encrypted connection (SSL)
- Use the following type of encrypted connection is None

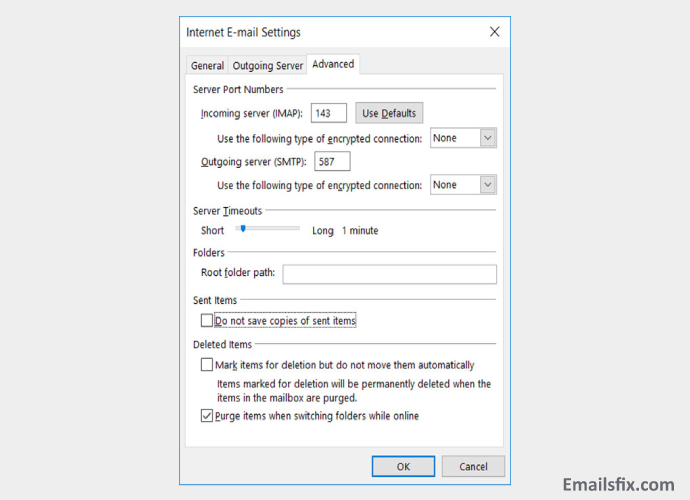
Cox IMAP Settings For Outlook 2010
- Incoming Port: 143, Outgoing Port: 587
- Secure - Port: 993and Security Type: SSL/TLS (Accept all certificates)
- Insecure - Port: 143 and Security Type: None (Accept all certificates
- Not ticked: This server requires an encrypted connection (SSL)
- Use the following type of encrypted connection is None

- Click on 'Next'.
- Click OK to save these settings.
- Click Next and Finish.
- Test the Settings.
Congratulations. You can now use Cox mail on Outlook 2016 and older versions like Outlook 2010.
We are hopeful that after going through this article, you were successfully able to set Cox on Outlook. If you are facing any issues, then don’t hesitate to reach out to us. There might be minor alterations in the steps if you are trying to set up an older version of Outlook. However, this outlook help guide applies to most Outlook iterations.
 Cox.net Email IMAP, POP3 & SMTP Server Settings
 Cox Email Settings for iPhone
 Cox Business Email POP3 & SMTP Server Settings